How to Remove a Tick from a Dog: A Step-by-Step, Safe, and Stress-Free Guide
Table of content
Introduction: The Worrying Find
How to remove a tick from a dog. Finding a tick on your beloved canine companion can immediately send a shiver of anxiety down your spine—and that’s totally normal! But don’t panic. Ticks are more than just a gross nuisance; they are tiny carriers of serious diseases like Lyme disease. Knowing how to remove a tick from a dog completely and correctly is one of the most important skills a pet owner can have. This clear, step-by-step guide will walk you through the safest method for tick removal, aftercare, and prevention, ensuring you can remove tick from dog safely every time.
While mastering the removal of external threats like ticks is vital, don’t overlook the importance of understanding and preventing internal parasites like Worms in Dogs
Preparation and Essential Tools
Your success depends on having the right gear. Think of this as putting together your essential Tick Removal Kit.
1. Gather Your Gear
The Gold Standard tool for safe tick removal is a pair of fine-tipped tweezers. They allow you to grasp the tick close to the skin. Alternatively, you can use a specialized tick removal tool (like a tick hook or spoon). For disposal, you’ll need a small, sealed container or a jar with rubbing alcohol to safely kill the tick after removal. Keep antiseptic wipes or a small amount of rubbing alcohol handy for cleaning the bite site afterward. It’s also wise to wear gloves for sanitary handling during tick removal. And don’t forget a yummy treat or a helper to keep your dog calm!
2. Positioning Your Dog
Before you start the process of how to remove a tick from a dog, make sure your dog is secure and comfortable. If possible, have them lie down or have a helper gently hold them. If the area is hard to see, use a flashlight—ticks can hide deep in the fur. Gently part the fur around the tick to get a clear view of where it meets the skin.
Step-by-Step Safe Tick Removal: The Core Process
This is the most critical part. You need to remove the tick’s entire body, including the mouthparts (the “head”), which are embedded in your dog’s skin.
1. Grasp Close to the Skin
Use your tweezers or specialized tool. It is crucial to grasp the tick as close to your dog’s skin surface as possible. You want to grip the tick’s mouthparts, not its engorged body. Do not squeeze or pinch the body. Squeezing can cause the tick to “regurgitate” potentially infected fluids into the bite wound, defeating the purpose of a safe remove tick from dog procedure.
2. Pull Straight and Steadily
Pull upward with steady, even pressure. Your motion should be like trying to pull a straight stake out of the ground. Do not twist, jerk, or rotate the tick. Twisting increases the risk of the mouthparts breaking off and remaining embedded in the skin. Remember, gentle, steady tension is key to successful tick removal.
3. Inspection and Confirmation
Once the tick is out, immediately inspect it to ensure it is intact—meaning the tiny head and mouthparts are still attached to the body. Then, check your dog’s skin to confirm that nothing remains embedded in the bite site. If the mouthparts did break off, don’t worry too much; they can sometimes be left alone as the skin will eventually push them out. If you can easily remove the remaining parts with the tweezers, do so, but do not dig or cause further trauma.
Aftercare and Disposal
You’ve done the hard part of tick removal! Now for the necessary cleanup and monitoring.
1. Clean the Bite Site
Thoroughly clean the area where the tick was attached. Use an antiseptic wipe, rubbing alcohol, or a dab of antibacterial ointment. A small bump or slight redness is normal after remove tick from dog procedures.
2. Tick Disposal (Mandatory Step)
Do NOT crush the tick. Crushing can release infectious fluids onto your hands or surrounding surfaces. The safest way to kill a live tick is to submerge it in a sealed container or jar of rubbing alcohol. You can also flush it down the toilet, but alcohol is the surest way to confirm it’s dead.
- Pro Tip for Vets: If your dog develops symptoms of illness later, your vet may want to identify the species. In this case, save the tick in a plastic bag with a moist paper towel and label it with the date of tick removal. This is an important step in subsequent tick treatment.
3. Monitor the Area
For the next few weeks, keep an eye on the bite site. Look for signs of infection like excessive redness, swelling, or pus. Also, monitor your dog’s overall health for signs of tick-borne illness, such as lethargy, fever, loss of appetite, or limping. Contact your vet immediately if you notice any changes.
What NOT to Do (Common Myths Debunked)
When learning how to remove a tick from a dog, it’s just as important to know what not to do. These methods are dangerous because they can irritate the tick, causing it to regurgitate infected fluids into your dog’s bloodstream.
- Don’t Use Heat: Never use a lit match, lighter, or hot needle. This is painful and ineffective for tick removal.
- Don’t Use Smothering Agents: Never apply petroleum jelly, nail polish, or oils. These just delay the tick removal and increase the risk of infection.
- Don’t Squeeze or Twist: Avoid grabbing the tick by its body or using jerky, twisting motions when attempting to remove tick from dog. Always pull straight and steady.
Prevention and Ongoing Vigilance
The best way to deal with ticks is to stop them before they start! Effective prevention is the best kind of tick treatment.
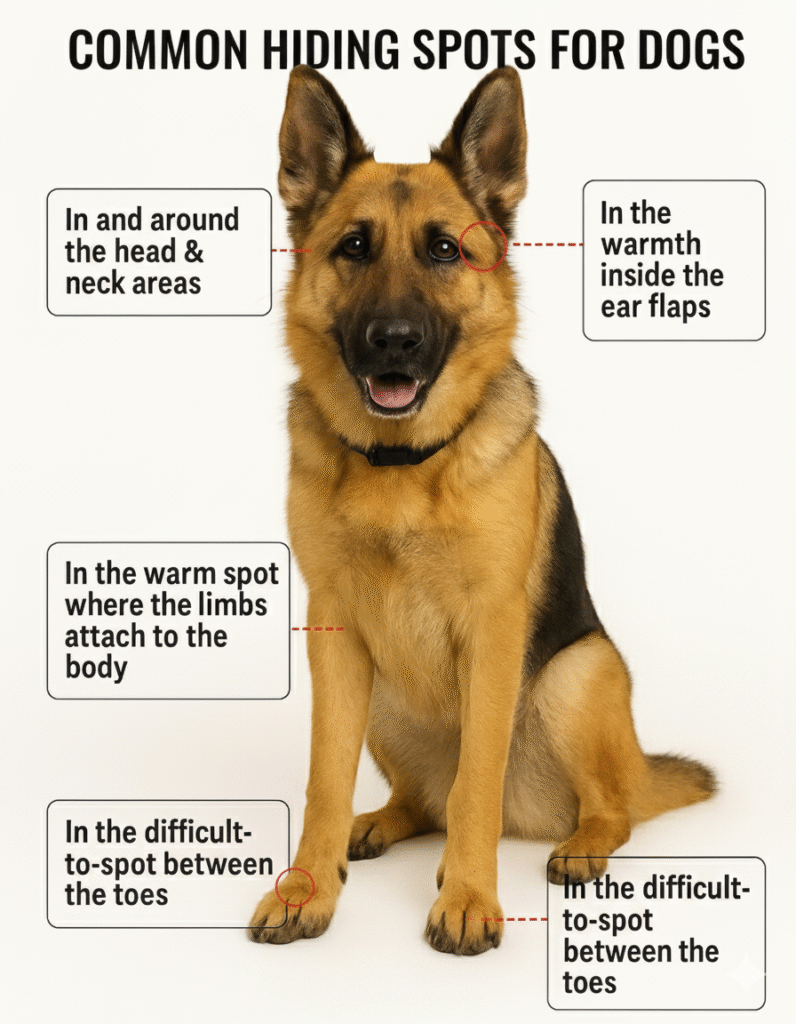
1. Daily Tick Checks
If you live in or visit tick-prone areas, make a routine of checking your dog after every walk. Focus on common hiding spots: inside and around the ears, between the toes, under the legs (armpits), around the tail, and in the neck folds. Run your hands over your dog’s coat, feeling for any small bumps.
2. Tick Prevention Products
The most effective way to prevent tick-borne diseases is with a reliable tick prevention product. These come in various forms, including oral medications, topical treatments (spot-ons), and specially treated collars. This is essential, ongoing tick treatment. Always consult your veterinarian for the best product recommendation based on your dog’s age, weight, health status, and specific risk level. They can help you choose the safest and most effective defense!
Conclusion
You are now fully equipped to handle this common nuisance! By preparing properly, understanding how to remove a tick from a dog safely, and implementing proactive prevention, you can keep your best friend safe and healthy. Congratulations on mastering this vital skill!